Mastering a robust software such as AutoCAD involves understanding and effectively using its various commands. Each command serves a specific purpose, and one of the most versatile is the TRIM command. This tool is indispensable for creating clean and precise drawings. It eliminates the segments of lines, arcs, circles, polylines, and other shapes that extend beyond the boundaries defined by the selected cutting edges. This article provides a comprehensive guide on the TRIM command, its functionality, and its applications.
Overview
The TRIM command in AutoCAD is a highly versatile and indispensable tool used to remove the segments of lines, arcs, circles, polylines, and other shapes that extend beyond the boundaries defined by selected cutting edges.
Detailed Description
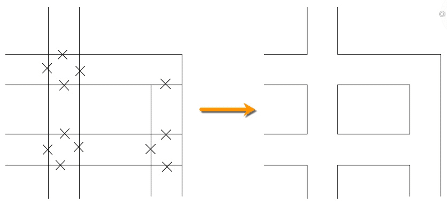
The TRIM command in AutoCAD operates on the principle of extending cutting edges and intersecting them with objects to be trimmed. It automatically extends or prolongs the cutting edges to intersect with the objects being trimmed. The segments of the objects that lie outside the cutting edges are then removed, providing a neat, trimmed result.
Modes and Options
The TRIM command offers different modes for various use cases:
- Trim: This is the default mode. It removes the portion of the line that is outside the selected cutting edge.
- Extend: This mode extends lines to meet a cutting edge, rather than removing parts of them.
- Edge: This mode allows you to define a new cutting edge without exiting the TRIM command.
- Undo: This option allows you to undo the last trimming action.
- Select All: This option allows you to select all objects as potential cutting edges.
Reasons for Using the TRIM Command
The TRIM command is an essential tool for creating precise, clean, and professional drawings. Here’s why you might use it:
- Precision: The TRIM command allows you to be precise in your drafting, ensuring lines intersect exactly where you want them to.
- Efficiency: Instead of manually trying to align objects or erase parts of them, the TRIM command automates the process, saving time.
- Flexibility: The different modes and options provided by the TRIM command offer a high degree of flexibility, allowing you to cater to a wide range of situations and needs.
How to Access the TRIM Command
There are several ways to access the TRIM command in AutoCAD:
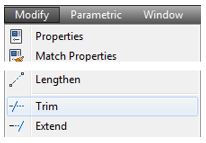
Menu: Modify > Trim
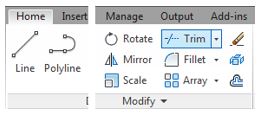
Ribbon: Home tab > Modify panel > Trim
Toolbar: Modify toolbar > Trim

Command Bar: Simply type ‘TRIM‘ and press Enter
Shortcut: TR
How to Use the TRIM Command
Here’s a step-by-step guide to using the TRIM command:
- Start the TRIM command by choosing one of the access methods mentioned above.
- Select the cutting edges. You can select one or multiple objects as cutting edges.
- Press Enter to confirm your selection.
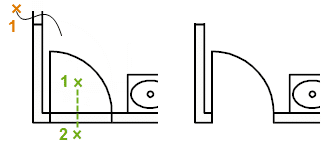
- Now, select the objects you want to trim. Click on the part of the object you want to remove.
- Press Enter to complete the command.
Quick Mode
- In AutoCAD, trimming objects is a methodical procedure. Choose each item you want to trim individually to start. This is the initial step in the procedure.
- To begin a freehand selection path, press and drag the mouse in the following step. The portions of the object that will be trimmed will be determined by this path.
- As an alternative, you can specify a crossing Fence by choosing two empty locations. This is an additional method of choosing the area of the objects to be trimmed.
- It’s important to keep in mind that every object has a cutting edge by default. Any portion of the object that protrudes past these edges can therefore be cut off.
- Last but not least, remember that selected objects that cannot be trimmed will be deleted. By doing this, you can make sure that your drawing is limited to the necessary objects and lines.
Standard mode:
- Trimming objects in AutoCAD begins by identifying and selecting the boundaries. Once you’ve chosen these edges, press Enter. This initiates the trimming process.
- Following this, you’ll need to select the objects you want to trim. These could be lines, polylines, or any other shapes that intersect with the previously selected boundaries.
- In some instances, you may want to use all objects as boundaries. In such cases, simply press Enter at the first ‘Select Objects’ prompt. This allows every object in your drawing to act as a potential boundary, offering more flexibility in the trimming process.
Youtube TRIM tutorials
Related AutoCAD Commands
Several other AutoCAD commands complement the TRIM command:
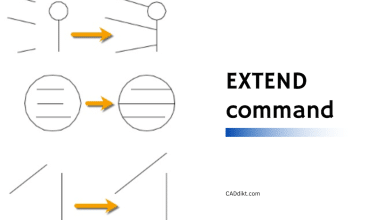
- EXTEND: This command is the opposite of TRIM. It extends lines to meet a boundary edge.
- BREAK: This command breaks an object into two objects at a point.
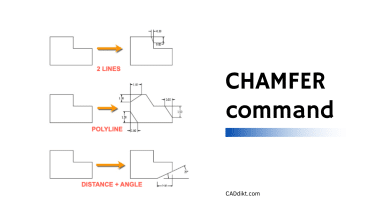
- CHAMFER: This command creates a beveled corner between two lines.
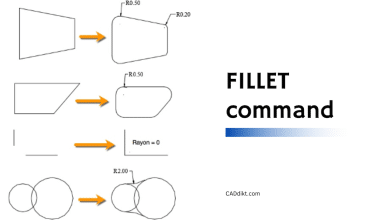
- FILLET: This command creates a rounded corner between two lines.
Remember that the best way to learn and master AutoCAD commands is by practicing and applying them in your projects. Happy drafting!
FAQ: Trim command
1. How do I TRIM an area in AutoCAD?
In AutoCAD, to trim an area, you first need to create a boundary edge. This could be a line, polyline, circle, etc. Then, using the TRIM command, you select the boundary edges and hit Enter. Finally, click on the area you want to trim, and AutoCAD will remove any part of the line or shape that extends beyond the selected boundary.
2. How to do quick TRIM on AutoCAD?
Quick Trim can be performed in AutoCAD using the ‘Fence’ selection option. When you initiate the TRIM command, rather than individually clicking the portions you want to trim, you can select ‘Fence’ from the command line options. Then, click and drag a ‘fence’ through the portions you want to trim.
3. What is TRIM and extend command in AutoCAD?
The TRIM and EXTEND commands in AutoCAD are used to modify existing lines or shapes. The TRIM command is used to remove portions of objects that extend beyond a defined cutting edge. Conversely, the EXTEND command is used to extend lines or shapes to meet a defined boundary edge.
4. How do you trim a rectangle in AutoCAD?
Trimming a rectangle in AutoCAD involves the same steps as trimming any other shape. Start by creating a cutting edge that intersects the rectangle. Then, use the TRIM command, select the cutting edge, and finally select the portion of the rectangle you wish to remove.
5. How do I delete and trim in AutoCAD?
In AutoCAD, you can delete and trim simultaneously. When you initiate the TRIM command, you can select the cutting edges, hit Enter, and then select the portions you want to remove. The unwanted portions are deleted, leaving behind a neatly trimmed object.
6. Why can’t I TRIM an object in AutoCAD?
If you’re having trouble trimming an object in AutoCAD, it might be due to a few reasons. The object you’re trying to trim might not intersect with the cutting edge, or the object might be on a locked layer. Make sure the object and the cutting edge intersect and the layer is unlocked.
7. Why is TRIM not working in AutoCAD?
Several issues could cause the TRIM command not to work in AutoCAD. The most common is selecting a cutting edge that doesn’t intersect with the object you’re trying to trim. Also, the object might be on a locked layer, or it might not be a trimmable object.
8. What is the opposite of TRIM in AutoCAD?
The opposite of TRIM in AutoCAD is the EXTEND command. While TRIM is used to remove portions of an object that extend beyond a cutting edge, EXTEND is used to lengthen objects so they reach a defined boundary.
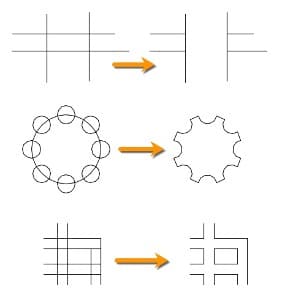
9. How do I trim a cross line in AutoCAD?
Trimming a cross line involves the same process as trimming any line. Use the TRIM command, select the cutting edge that intersects with the cross line, and then click on the portion of the cross line that you want to remove.
10. How do I trim hatch lines in AutoCAD?
Trimming hatch lines in AutoCAD is not directly possible because hatches are considered single entities, not a collection of individual lines. However, you can first EXPLODE the hatch, turning it into individual lines, and then use the TRIM command. Note that this might not always give the desired result.
11. Can you trim solids in AutoCAD?
In AutoCAD, you can’t directly trim 3D solids using the TRIM command. For 3D solids, there are operations like SLICE, INTERSECT, UNION, and SUBTRACT that can be used to modify them. However, if you’ve created a layout view with a section plane of the 3D solid, you can use the TRIM command in that context.
12. Can I trim a 3D object in AutoCAD?
The TRIM command in AutoCAD typically applies to 2D objects. For 3D objects, different commands are used to achieve similar results, such as SLICE to divide an object, and INTERSECT, UNION, and SUBTRACT to create complex 3D shapes.
13. Why can’t I TRIM a polyline in AutoCAD?
If you’re having trouble trimming a polyline, it might be because it’s not crossing or touching the cutting edge. Make sure the polyline and cutting edge intersect. If the polyline is a complex shape, consider breaking it down into simpler segments before trimming.
14. How do I TRIM extend shift in AutoCAD?
The TRIM and EXTEND commands in AutoCAD can be combined with the SHIFT key to switch between them quickly. Start the TRIM command, then press and hold the SHIFT key while selecting the objects you want to extend.
15. What is the difference between TRIM and BREAK in AutoCAD?
While both TRIM and BREAK modify objects, they do it differently. TRIM removes an extending part of an object based on a cutting edge. On the other hand, BREAK divides an object into two separate objects at a specified point without the need for a cutting edge.
16. How do I trim a line in AutoCAD?
To trim a line in AutoCAD, start the TRIM command, then select the cutting edge. Once done, click on the portion of the line you want to remove. The line segment beyond the cutting edge will be removed.
17. Why is TRIM freezing in AutoCAD?
If AutoCAD is freezing when you use the TRIM command, it could be due to a few reasons. You might be working with a complex drawing with many objects, causing AutoCAD to require more processing power. Or there could be a problem with your AutoCAD installation. Try purging the drawing or reinstalling AutoCAD if the problem persists.
18. Can I use TRIM command on blocks in AutoCAD?
Yes, you can trim blocks in AutoCAD, but the blocks must be exploded first. A block in AutoCAD is a collection of objects grouped into a single object, and the TRIM command will not work on them unless they are exploded into individual entities.
19. What are the limits of the TRIM command?
The TRIM command in AutoCAD can’t trim certain objects such as blocks, dimensions, and hatch patterns without first exploding or converting them into basic geometrical objects. It’s also worth noting that the command doesn’t work in 3D space.
20. Can I trim multiple lines at once in AutoCAD?
Yes, you can trim multiple lines at once in AutoCAD. After activating the TRIM command and selecting your cutting edges, you can select multiple portions of different lines that you want to trim.
21. How do I use TRIM with the command line?
To use TRIM with the command line, type ‘TRIM’ and press Enter. Then, you can select your cutting edges and press Enter. Now you can select the objects or lines you want to trim.
22. What if the TRIM command does not remove the desired segment?
If the TRIM command does not remove the desired segment, ensure that the segment you want to trim extends beyond or touches the selected cutting edge. If the segment is not in contact with the cutting edge, the TRIM command will not work.
23. How do I control which segment is trimmed when two segments overlap?
When two segments overlap, the specific segment you click on will be trimmed. If you want to trim a specific segment of an overlapping section, be sure to click on that segment. If you accidentally trim the wrong segment, use the UNDO option to revert the action.
24. Can I use the TRIM command on a spline in AutoCAD?
Yes, you can use the TRIM command on a spline in AutoCAD. The process is the same as trimming a line or a polyline. The cutting edge must intersect with the spline, and then the part of the spline to be trimmed is selected.
25. Can the TRIM command be used in conjunction with other commands?
Absolutely. The TRIM command is often used in combination with other commands in AutoCAD. For instance, you might first use the OFFSET command to create a parallel line that will serve as your cutting edge, and then use the TRIM command to remove the unwanted segment. This kind of workflow is quite common in AutoCAD.
Conclusion
Understanding and effectively utilizing the TRIM command in AutoCAD can significantly improve your drafting efficiency. This command, though simple in its concept, offers an array of possibilities when it comes to shaping and modifying your drawings. With the right knowledge, you can leverage this tool to shape your drafts precisely the way you want, saving time and effort in the process.
Remember that mastering any command in AutoCAD, including TRIM, comes with practice. Don’t hesitate to explore and experiment with this tool in different scenarios and designs. The more you use it, the more you will understand its potential and the range of applications it can handle. Happy drafting, and may the TRIM command be the secret weapon in your AutoCAD arsenal.